More and more sellers are choosing independent stores to start their eCommerce businesses. Compared with platforms like Amazon and eBay, independent stores offer greater profit control and more freedom in brand presentation. Shopify, as one of the most well-known independent store platforms, is powerful but often feels complex to beginners. Improper registration or incorrect backend settings can easily lead to store suspension or closure.
In fact, building a Shopify store is not difficult. As long as you follow a standardized process and apply proper security practices, you can complete store setup, launch smoothly, and operate stably. This article systematically explains the complete Shopify store-building process from zero, helping you go live quickly and run your store with long-term stability.
I. Shopify Store Setup Tutorial
1. Preparation Before Building a Shopify Store
Before registering a Shopify account, you should prepare the following materials in advance. All information should be real and verifiable to reduce the risk of store suspension or banning caused by risk control issues later.
Email
It is recommended to use Gmail or Outlook to register a Shopify account. Avoid using local email providers, as they may fail to receive verification emails or cause account instability.
Domain
Prepare an independent domain in advance. It is recommended to choose a short, memorable domain consistent with your brand category, such as .com, .io, or .store.
Proxy
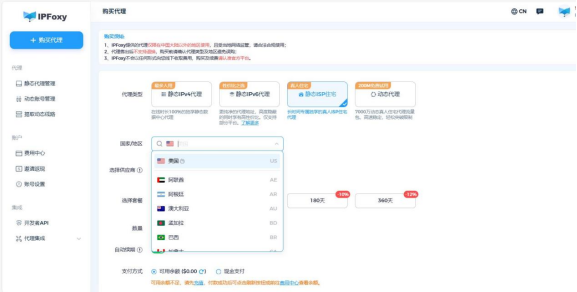
Prepare a stable, clean, and independent residential proxy for Shopify registration and backend login. It is recommended to use high-quality proxy services such as IPFoxy and avoid public or low-quality proxies.
Payment Tools
- A dual-currency credit card or a personal PayPal account for paying Shopify subscription and app fees
- A PayPal business account for store payments, registered with valid individual or business credentials
Theme
If you have higher design requirements, you can choose a paid theme. Beginners or those with limited budgets can start with official free themes.
Products and Content Materials
Prepare product images, descriptions, videos, brand logo, and pages such as About Us, Contact Us, and FAQ in advance to improve setup efficiency.
2. Shopify Store Registration Process
During the registration and setup stage, it is crucial to maintain a stable network environment and avoid frequent IP changes such as public IPs or shared proxy networks. IP inconsistency may trigger account suspension or banning.
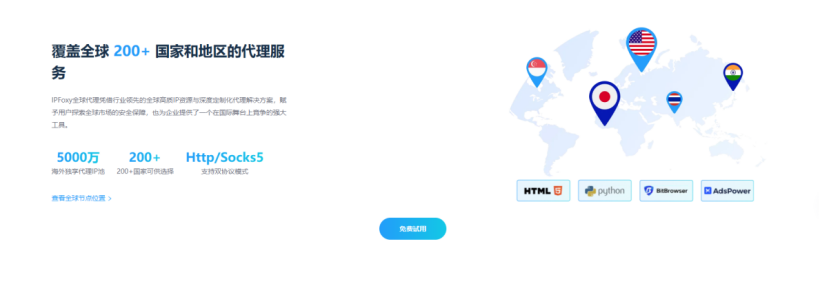
It is recommended to use a static residential proxy and select an IP region that matches your target market. Define your audience location in advance instead of using broad regional settings. For example, use a US IP for the US market and country-specific IPs for Southeast Asia to avoid traffic distribution or ad delivery issues.
In this regard, IPFoxy provides high-quality independent residential proxy services with multi-region coverage, including North America, Europe, Southeast Asia, Australia, and the Middle East. You can choose country- or city-level IPs based on your target audience to ensure long-term stability for Shopify stores and ad accounts.
Shopify offers a 3-day free trial. For the first three months, the cost is USD 1 per month. After that, plans range from USD 20 to USD 299 per month.
Detailed registration steps are as follows:
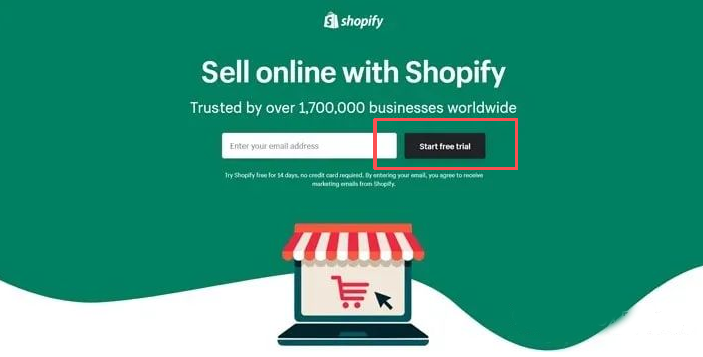
- Open the Shopify registration page, enter your email address in the “Enter your email address” field, and click “Start free trial”.
- Set your email and password to create a Shopify account.
- Fill in basic business information as needed, or click “I don’t want help setting up” at the bottom left.
- Choose a plan or skip it and continue with the 3-day free trial.
- After registration, you will be redirected to the Shopify admin dashboard.
If no plan is selected after the trial ends, the store will be temporarily closed, but data will be retained for a period and can be restored after renewal.
3. Shopify Store Backend Setup
1. Store Information Configuration
Store Name and Address
Go to Settings → General → Store details to edit the store name and billing address. The billing address should be real, especially if you plan to use Shopify Payments.
Store Currency
In Settings → Store defaults, set the store currency before receiving the first order. Changing currency after the first order requires contacting Shopify support.
Timezone
Set the timezone to match your ad account timezone for easier data tracking and campaign management.
Privacy and Return Policies
Policy pages improve customer trust and reduce legal risk.
Go to Settings → Policies → Manage → Enable.
Use Shopify’s built-in templates to generate return, shipping, privacy, and terms of service policies, then customize them based on your business needs.
2. Payment and Checkout Settings
Payment Methods
For beginners, PayPal is recommended as the primary payment method.
Payment strategies should match market preferences:
US and Europe mainly use credit cards and PayPal
Latin America relies more on cash-based methods
Southeast Asia prefers local e-wallets
Checkout Settings
After uploading at least one product, configure the checkout page and simulate test orders to optimize the payment experience.
Shipping and Delivery
Set clear shipping rules and display costs transparently to avoid conversion loss at checkout.
Taxes
Register and obtain a tax number if required by your local regulations.
Domain Connection
The default myshopify.com domain is not ideal for branding or SEO. It is recommended to connect a custom domain.
4. Creating Store Pages
After completing basic settings, start building core store pages. Go to Online Store → Pages and click “Add page”.
Enter the page title and content. Titles should be concise as they appear in browser tabs and search results. Shopify’s editor supports text, images, videos, tables, and external links.
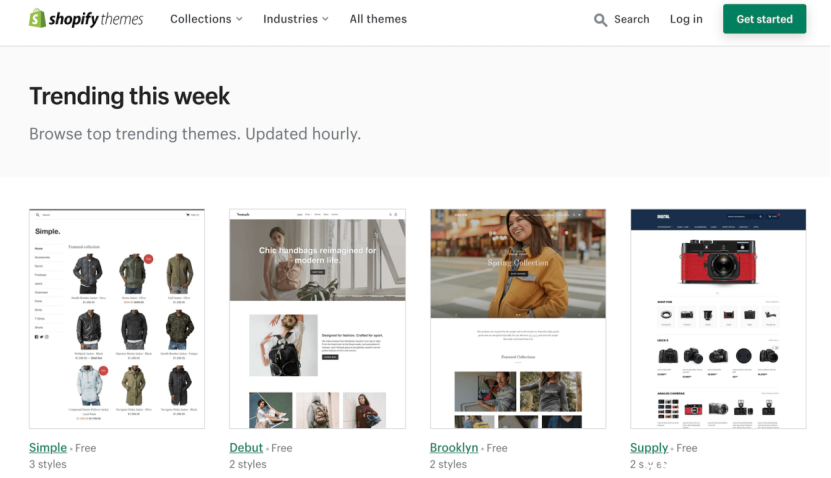
Theme options include:
- Official free themes: Dawn, Refresh
- Official paid themes: Prestige, Impulse
- Third-party themes: ThemeForest
Beginners are advised to start with official free themes for stability and performance. Upload products first and design pages around product structure to improve conversion efficiency.
5. Pre-Launch Checklist for Shopify Store
Before launching, conduct a full inspection to avoid configuration errors that affect user experience or compliance.
Check whether:
- Store language matches the target market
- Currency is set correctly
- Primary Market is configured
- Store name uses a consistent English brand name
- All page links work properly
- Content has no spelling or grammar errors and test orders are completed
After confirmation, go to Online Store → Preferences and disable password protection. The store will then officially go live.
Conclusion
Building a Shopify store is not a one-time task but a foundational system for long-term eCommerce growth. Instead of focusing only on launching quickly, it is more important to establish a stable and compliant structure from the beginning. Testing products and markets step by step under a secure and standardized setup is the core logic for sustainable Shopify store growth.